
Advanced Diplomacy Maneuvers
A guide to hidden board mechanics, obscure rule interactions, and high tactical play.

Strong players know the map, the openings, the stalemate lines, and the usual alliance rhythms. They can count centres, read tempo, smell a stab coming, and avoid the obvious tactical blunders. But Diplomacy is deceptively small. The board is fixed, the units are limited, and experienced players can start to believe they have seen most of what the game can do.
They usually have not.
Some of the strongest tactics live in the narrow spaces between movement, support, convoy, retreat, and dislodgement rules. This article covers those edge cases: the advanced fundamentals serious players need to command, and the stranger manoeuvres that still catch strong players off guard. Knowing these manoeuvres is useful. Recognizing when they are live is the real step up, when strong players stop asking what appears possible and start asking what will actually adjudicate.
One caution: house rules, variant interpretations, and platform settings can affect obscure tactics. Before relying on an edge case, verify how it will be adjudicated.
Part 1: Rules Edge Cases
These tactics begin with rules knowledge. Not trivia for its own sake, but rules knowledge that changes what is possible on the board.
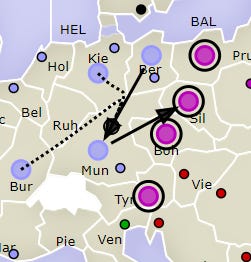
1. The Beleaguered Hold
If a unit is attacked from multiple directions with equal force, the attacks bounce and the occupying unit is not dislodged. The attacks do not combine against the defender. They compete with each other.
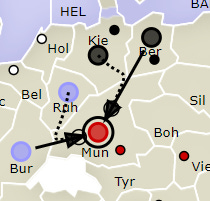
In this scenario, both France and Russia attack Munich…and both fail due to the equal strength attack ultimately bouncing (leaving the Austrian unit not dislodged).
2. The Coastal Support Loophole
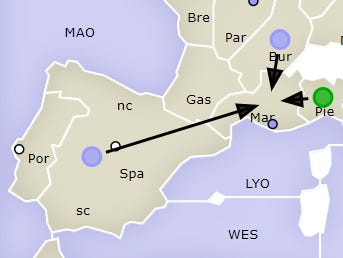
Many players are confused about how the rules apply to the three provinces with separate coastlines (Spain, St. Petersburg, and Bulgaria). In particular, players often misunderstand how neighboring fleets can issue supports to these spaces.
The rule is that if a fleet can move into one coast of a province, then it can support any action in that province (regardless of coast).
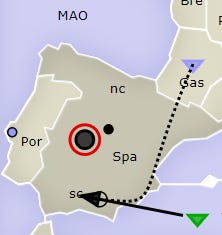
For instance, a fleet in Marseilles can support a fleet in Gascony to move to Spain (nc), even though the fleet in Marseilles cannot itself move to Spain (nc). The fleet in Marseilles can move to Spain, and that is sufficient. Similarly, a fleet in Livonia can support hold a fleet in Saint Petersburg (nc).
3. The Convoy Swap
Two units normally cannot trade places directly. If Army A moves to Army B’s province while Army B moves to Army A’s province, both moves bounce.
The exception is convoy movement.
Two units can trade places if either one, or both, move by convoy.
This is rare, but it matters in congested positions where the normal movement rules appear to lock units in place. A convoy swap can reorganize a front line without needing an extra tempo to clear space first. The payoff is tempo. You are not gaining a centre directly, you are saving a move in a position where one saved move can change the next year’s tactics.
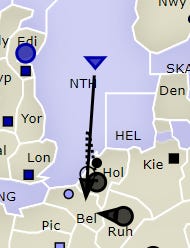
4. The Backup Convoy
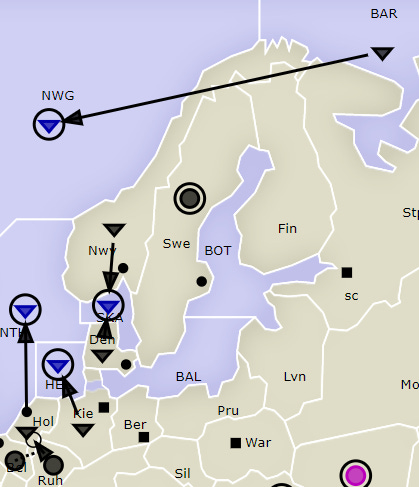
In this example, Germany really wants to convoy an army into Edinburgh, but faces a risk of England dislodging one of the German fleets. Edi supported to Nth would cancel a convoy from Nwy to Edi and Edi support to Nwg would cancel a convoy via Nwg. This is solved by using multiple routes.
An army using multiple convoy routes reaches its destination as long as at least one valid convoy route remains open. There is no requirement that a player indicate which convoy route the army will use.
To ensure the convoy succeeds, Germany sends the army via both convoys. If either fleet is dislodged, the other will still succeed.
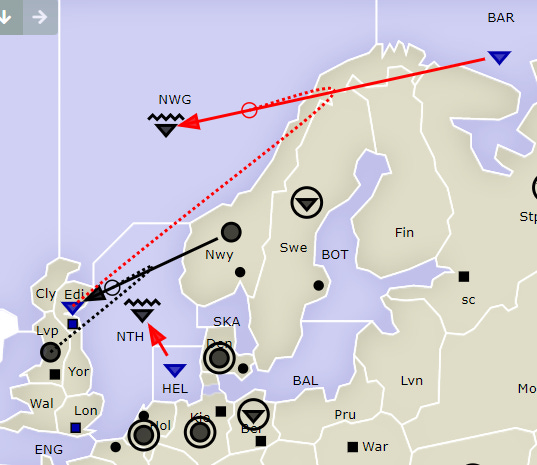
In this particular example, the successful convoy cuts the support order coming from Edinburgh, so neither fleet was ultimately dislodged and Edi is successfully taken.
Part 2: Defensive Geometry
These manoeuvres defend space through movement structure, not raw support strength.
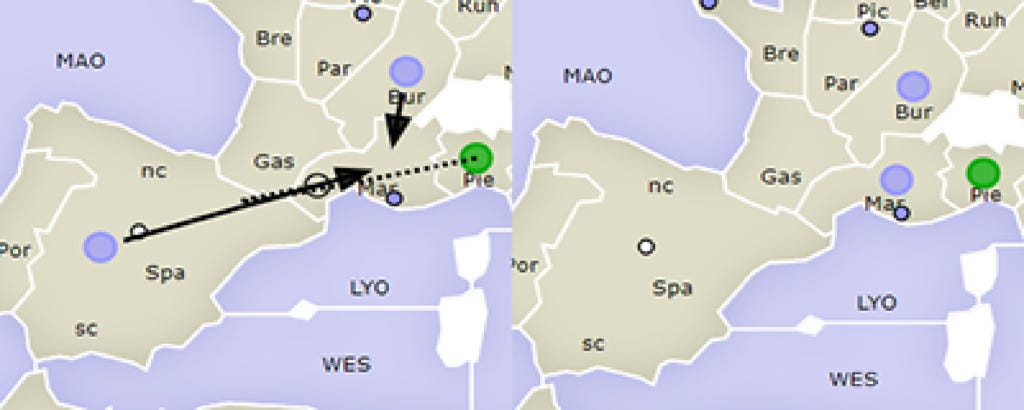
5. The Self-Bounce Shield
A player can create their own “standoff” (a.k.a. a bounce) by ordering two of their own units to attack the same province with equal strength. A player might do this to maintain control of three provinces with two units, especially if the player does not want to move units out of tactical positions. The self-standoff also allows a player to defend a home center while also leaving it open for a build.
In this scenario, France predictably self-bounces in Marseilles in order to capture Spain, protect Marseilles, and leave Marseilles open for a build.
6. Defense by 1,000 Support Cuts
If a center is at risk of supported attack, but the defender is not certain about which enemy unit will issue the support order, then strong defense tactic is to cut all possible supports to ensure that all possible attacks fail.
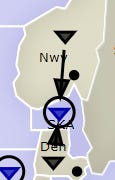
In this example, Norway and Denmark are both at risk of a double-supported attack with only enough defensive support available to fully defend one of them with support holds.
Rather than leave the outcome to chance, Germany cuts support of all the enemy fleets here. This neutralizes all possible attacks. In particular, Skagerrak gets a Scissor Cut from both sides to ensure it can’t support a move into either Norway or Denmark (see next section, “Scissor Cut”).
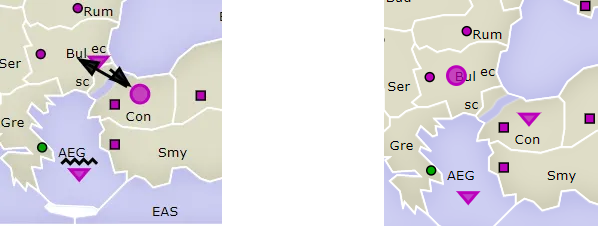
7. The Scissor Cut
This is useful in situations where the defender must guess which of two adjacent provinces an enemy is planning to attack, or when the defender’s support hold orders are at risk of getting cut. Often the attacker will use the middle unit as the supporting unit in order to maintain an undisrupted front line as they push forward (see next section, “Beleaguered Garrison Rule Exploit”).
To counter this, the defender uses two units to hit that middle attacker unit so that the attacker is unable to support attacks against either defending unit. Everybody bounces.
This defensive tactic is a gamble. If the attacking player supports that middle unit into one of the provinces, this maneuver could end up inadvertently costing the defender both provinces. So if you are considering this tactic, take a moment to analyze the mind of the particular opponent you are dealing with before taking the risk.
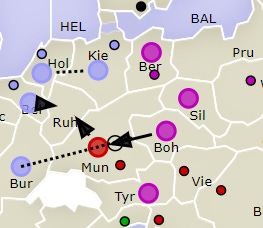
8. Beleaguered Garrison Rule Exploit
This tactic is quite powerful when multiple provinces are at risk.
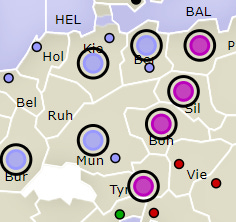
First, the defending player moves one threatened unit to cut a potential support order from an enemy unit that is likely to issue a support. Then, supported by as many other units as necessary, the defending player moves a threatened unit sideways to the other occupied province that is threatened with attack (the same province the first moving unit moves out of).
By doing this, the player simultaneously cuts off a likely source of support and triggers a beleaguered garrison bounce on one of the provinces that could be attacked. If this works, everything is safe and bounces back to where it started. This only fails if the player guesses wrong about which unit will issue the support order.
Some players mistakenly see the above situation as a coin toss where either Munich or Berlin has a 50:50 chance of being lost. However, If Silesia supports Prussia to Berlin, Munich cuts that support order and Berlin is safe. These moves protect Munich due to a Beleaguered Garrison defense. The only possible successful attack in this scenario would be Silesia to Berlin (supported by Prussia), making this defense much stronger than a “50:50” guess.
Part 3: Hostile Help
Hostile support is one of the nastiest advanced tools in Diplomacy because it uses another player’s own orders against them. You do not force an illegal move. You make their legal move succeed at the wrong time.
9. Hostile Support to Self-Bounce
A clever counter to an anticipated self-standoff is to give “hostile” support to one of the enemy unit’s moves.
Supporting the opponent’s move will cause that unit to succeed in moving into the province.
This is useful for pulling a unit away from its position so a different unit can walk into its former position, pulling a unit off of an unclaimed center in the Fall to prevent a capture, or pulling a unit into a home center to block a build.
Almost the same scenario as previously illustrated for the “Self-Standoff.” However, because Italy supports Spain to Marseilles, France does not capture Spain and cannot build in Marseilles.
10. Hostile Support to Harass an Enemy Alliance
Sometimes, one member of an alliance will attempt to backfill (or defensively bounce) the other member’s province with no intention of actually entering the province. To interfere with their intended outcome, an enemy player can give “hostile” support to the unit moving into the ally’s space. This hostile support might force a disband of an enemy unit or cause a player to capture their ally’s home center.
In the illustration, assume alignment between Russia and Austria. France anticipates that Bohemia will move to Munich simply to cover Munich while the army in Munich attempts to bounce a French move to Ruhr. To harass Russia and Austria, France support Bohemia’s move to Munich in order to force the disband of the Austrian army.
11. The Hostage Convoy
Many online adjudicators do not require the player to specify if a unit is moving via land or via convoy. What happens is the unit defaults to moving via land if possible and then attempts to convoy. The fun part is, this does not require the army owner’s permission, so if an army were to move towards another army and fail, then it would default to convoy and swap places!
Note: Not every Diplomacy adjudicator will permit this, as there are some community specific rulesets where mode of movement (land/convoy) must be specified.
Part 4: Allied Exploits
These tactics require cooperation. Used well, they let allies do things the normal movement phase does not easily allow: convert unit type, move after adjudication, or enforce an agreement through orders rather than trust alone.
12. The Friendly Disband
This is a clever tactic for when one ally far out of position and could really use a build back at their home centers. One ally will dislodge the other’s unit, permitting that player to disband and rebuild the dislodged unit. Opponents will often not expect this, which can turn the tide quickly as they face a surprise build!
This tactic is also useful when a player needs to change one type of unit to another. For example, in a juggernaut alliance between Turkey and Russia, Turkey might dislodge Russia’s Black Sea fleet so that Russia can rebuild that unit as a more useful army.
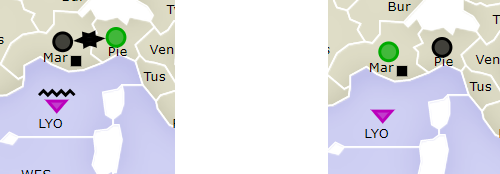
13. The Ally Retreat Slingshot
This is a tactic allies can use to have the freedom to move their unit after everybody else moves first. A player will dislodge their ally’s unit so their ally can use the retreat phase to move the unit.
In this example, Germany and Russia are working together against Italy. By dislodging Germany’s unit, Germany will be able to retreat to whichever of Tunisia or Naples was not covered by Italy.
This can be extremely useful when the board contains multiple possible targets and the defender cannot cover all of them. The payoff is delayed commitment. Normal moves are blind. Retreats are chosen after the turn is revealed. That timing difference can be weaponized very effectively.
The risk is that retreat spaces may be blocked, occupied, or made illegal by the move phase. If the retreat options vanish, the unit may be destroyed. This tactic should be used only when the retreat map is clear.
14. “Schizophrenic Support”
Richard Sharp previously shared this tactic, which is useful in enforcing agreements. The allies plan a set of moves that will only succeed if both players move as agreed. Specifically, one of the players simultaneously moves into a province while supporting the ally’s move into that same province. The supported player must move with the exact unit they agreed to move. If they don’t, the moves will bounce.
In this example, Germany agrees to allow England to have Belgium, but only if England uses a fleet. Germany supports North Sea to Belgium while also sending Ruhr to Belgium. If England uses the North Sea fleet, England will get Belgium—but if England convoys from Edinburgh, that move will bounce.
Final Thoughts
Advanced tactics in Diplomacy are not about displaying obscure rules knowledge. They are about seeing the hidden structure of a position: where pressure really sits, which orders actually matter, and what outcomes the adjudicator will allow.
The best players do not reach for these maneuvers because they are clever. They use them because the board has made them relevant. The difference is not knowing the trick, it is seeing the moment when the trick becomes the position.